- Intro: An Antidote for Infoxication
- Deploy your AwesomeKB
- But, is it really FREE?
- Continuous Documentation Builds
- Security Considerations
- Can we make this AwesomeKB even more Awesome?
- Credits
Intro: An Antidote for Infoxication
DEDICATION: This article is dedicated to my fellow companions at the Global SOC, specially to Drunken Admiral, Hulk Huggies and Kung-Fu Panda (you know who you are)
Threat Hunting is as much an operational task as it is one of research and development . We are constantly investigating how threat vectors work and how to best detect them in our environments. As such, having an organized repository with our own playbooks and hunting ideas is a must to keep track of the ever changing threat landscape.
I always tell my students they should start developing their personal Knowledge Base(s) and treat them with the highest respect. Why? well, you know our profession is one of continuous new developments and information pours from all over: twitter, podcasts, blogs, colleagues, courses, etc. To be successful as a cybersec pro, you need a way to avoid infoxication.
I need a KB bro!

Information overload is real (“alert fatigue” in SOCs is a subtype of it). The reason we should care about it is that poorly managed information consumption leads to reduced decision making skills. As leaders, security analysts, responders, threat hunters, we are in the frontlines, dealing with threats that come in multiple ways. Sharpness of mind during decision-making workflows is sometimes the difference between achieving our objective or letting the adversaries achieve theirs.
When mentoring other security analysts, I can never stress enough the importance of having your own KB. Think of it as a space where you have control of how the information gets in and gets laid out: an external HDD for your mind. However, your KB is more than just that, statically stored information on a HDD is not the best analogy.
A KB is the place where you tell a story the way you understand it. By elucidating the connections between the different bits and pieces of data you absorb on a daily basis, you will create information: linked data with a context, a purpose and its own semantic field. From simple links about cool tools or blog posts, to complex explanations of a particular topic, a KB is a must if you want to be at the top of your game. Nevertheless, finding a nice, simple, cost friendly (ideally free) and available way of achieving this is not an easy task.
In the face of this problem, I’ve kept multiple types of KBs along the years: word documents, simple .txt, OneNote, privately hosted wikis, etc. The problem with these solutions is that they are either not scalable (simple documents), not available from everywhere (locally hosted), not elegant (wikis), cumbersome (OneNote), not free (private ReadTheDocs), not automation-friendly (all of them), not code friendly (some of them). I needed a solution that complied with the following requirements:
- Markdown AND reStructuredText friendly
- Programmatic, that is, allowing automation of some or all of the processes involved in producing documentation
- Code friendly (GitHub, GitLab)
- Graph friendly (I would like to be able to embed/display plotly-style graphs created with my Jupyter Notebooks)
- Secure: 2FA
- Flexible Access Control and Identity Management: what if I want to give someone access to a subsection of my KB?
- Available 24x7x365
- Full Text Search
- Version Control
- FREE! Yes, as in what William Wallace wanted for Scotland
- Low footprint (ideally running on less than 512MB RAM)
The first time I saw a solution that was elegant (beautiful and simple) and free was thanks to darkoperator’s (Carlos Perez) post here. He had an excellent idea: why not just organize your KB as Markdown documents hosted in a Gitlab/Github repo? You have the advantage they can be rendered as HTML, Gitlab gives you free private repos by default, and they enjoy the flexibility of .md (conversion to other formats like pdf, etc.). Needless to say: I went this way, and it meant a huge improvement. However, there were a few issues: keeping updated TOC becomes a nightmare as the KB grows, HTML rendering by these platforms can be very slow for big docos, no granular access control, lack of design flexibilities, etc. Also, using something like Github Pages to address the “lack of design freedom” means my documentation would be publicly available, which defeats the access control requirement.
So after much (unsuccessful) googling around for a solution that would achieve my goals I decided to compose one myself. That was early 2018 lol, it wasn’t until recently that I actually had the time to develop this.

Enter JSTACK-AWESOMEKB. In this post, I’m going to walk you through the steps required to setup your own AwesomeKB.
Deploy your AwesomeKB
The Jaguar Stack (jstack a Threat Hunting and IR platform) is a small project I’m working on which hasn’t seen the light yet, as the KB is meant to be a module of it, I’m releasing it standalone for the moment. The KB is comprised of the following elements:
- Docker for isolation, security, simplicity
- Sphinx to build the documentation from .rst or .md files as well as full-text search
- Authelia for 2FA and Granular Access Control
- AWS for continuous availability and EC2 free-tier facility
- LDAP server for basic IAM (you can create users and control their access to one or many KBs as well as sections within them)
- NGINX to serve the KBs as well as reverse-proxy abstraction
- Redis and Mongo (required by Authelia)
So without further ado, let’s get to it shall we?
1. Create an AWS Account
If you don’t already have one, please do so just because it’s pretty cool.
2. Launch EC2 Instance
-
Launch a
t2.microUbuntu Server 18 instance
-
Select a
t2.microinstance (free tier eligible) and hit “next”, accept all defaults.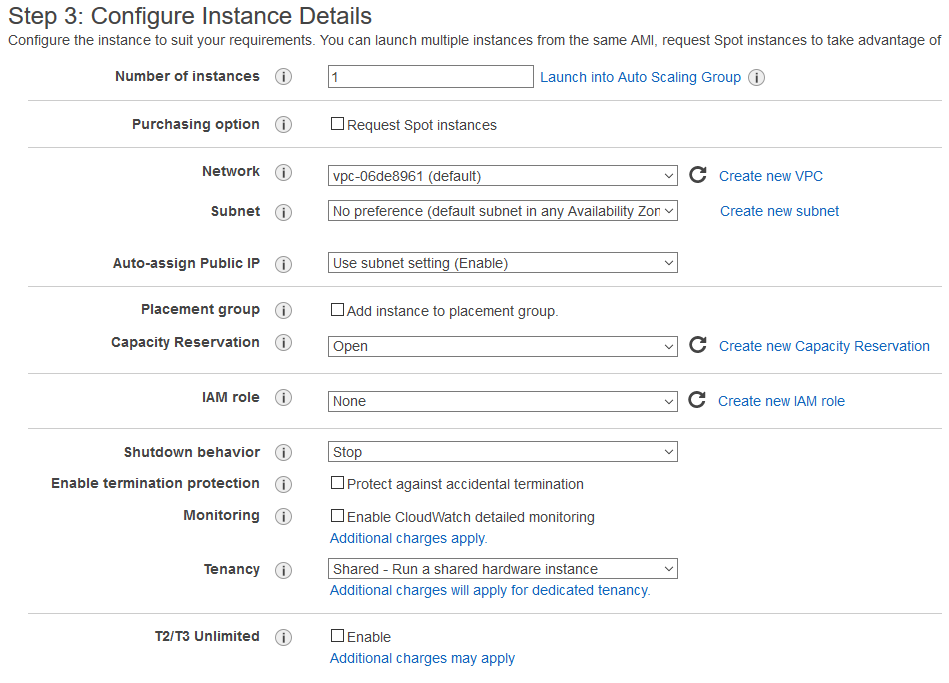
-
Keep accepting defaults until you get to Step 6 Configure Security Group. Here make sure you add a rule for HTTPS access (this will allow us to reach our AWESOMEKB server from the internet).
-
Review and launch the instance. Once the instance is running, grab its public IP or “amazonaws.com” hostname and use the SSH key pair certificate created during the deployment process to authenticate.
If you are using Putty to connect to the instance you will have to convert the
.pemcertificate to.ppkusing PuttyGen. If you need help, follow AWS’ own guide.
- Great! by now you should be connected to the EC2 instance via SSH. Let’s move on to the next phase.
3.A Deploy the Easy Way
If you want to skip the step by step guide (required for you to truly grasp the kb stack functionality but not if you want to quickly test) you can easily have your KB up and running by following these two steps:
-
Clone the repo:
git clone https://[email protected]/darkquasar/jstack-awesomekb -
Deploy it all:
 cd jstack-awesomekb
 sudo ./deploy.sh deploy-all
This will get your KB up and running!
Now you need to go to point (6) here to follow the steps for first login.
3.B Install Pre-Requisites
In order for the KB to work, we need to install a few things like docker and docker-compose. All these steps are automated in the jstack-awesomekb repo’s deploy.sh script, however, I’m going to follow the steps here so you can have a better picture.
Let’s install Docker (if you want to know more check this post and also this one). This is what we need to run:
sudo apt-get update \
&& sudo curl -fsSL https://download.docker.com/linux/ubuntu/gpg | sudo apt-key add - \
&& sudo add-apt-repository "deb [arch=amd64] https://download.docker.com/linux/ubuntu $(lsb_release -cs) stable" \
&& sudo apt-get update \
&& sudo apt-get install -y docker-ce apache2-utils \
&& sudo service docker start \
&& sudo curl -L "https://github.com/docker/compose/releases/download/1.22.0/docker-compose-$(uname -s)-$(uname -m)" -o /usr/local/bin/docker-compose \
&& sudo chmod +x /usr/local/bin/docker-compose \
&& sudo usermod -aG docker ${USER} \
&& echo "Let's create a simple user so that we can access MailCatcher later in the demo environment" \
&& sudo htpasswd -bcB docker/compose/nginx/portal/.htpasswd jaguarlord MyAwesomePassword
What we are doing here is:
sudo apt-get update
sudo curl -fsSL https://download.docker.com/linux/ubuntu/gpg | sudo apt-key add -
sudo add-apt-repository "deb [arch=amd64] https://download.docker.com/linux/ubuntu $(lsb_release -cs) stable"
We need to add the GPG keys of the docker software repo, this is a way of saying we “trust” what’s inside download.docker.com/linux/ubuntu. By downloading the key with curl piping the file to apt-key and appending a dash (-) to the end we are telling apt-key to read the key from stdin.
We then add the repository for the version of Linux we are using, which can be automatically obtained by running lsb_release -cs.
After that, we must install docker-ce, apache2-utils (which we will use to generate a .htpasswd file that will help us do some simple http authentication to access some of the demo services in the stack) and docker-compose (by downloading the binary).
Finally we default ubuntu user of the EC2 instance (that is, if you didn’t sudo su) and we create the abovementioned .htpasswd file with a default username of jaguarlord and default password of MyAwesomePassword. Adapt this last bit to your needs.
At this point, you will have to close your current SSH session and connect back in so that the non-root ubuntu user can issue docker commands without sudo as well as making docker-compose foundable by bash.
You can automate this process by cloning the repo from the start and using
./jstack-awesomekb/deploy.sh install-prerequisites
4. Deploying JSTACK-AWESOMEKB

Great! if you made it here, the rest is easy.
-
Let’s begin by cloning the awesomekb repo:
git clone https://[email protected]/darkquasar/jstack-awesomekb -
Generate Certificates (or not ;) If you want to generate your own certificate keys for SSL instead of using the default ones you can do so with (this is also automated in deploy.sh with
./jstack-awesomekb/deploy.sh gen-certs):portal_serv_certpath=jstack-awesomekb/docker/compose/nginx/portal/ssl # generate the private key openssl genrsa -out $portal_serv_certpath/server.key 4096 # generate the certificate signing request, change the subject parameters to whatever you want, I used a city in Argentina ;) openssl req -new -key $portal_serv_certpath/server.key -out $portal_serv_certpath/server.csr -subj "/C=AR/ST=Salta/L=Salta/O=J-Stack/CN=JS" # finally generate the certificate itself openssl x509 -req -sha256 -days 999 -in $portal_serv_certpath/server.csr -signkey $portal_serv_certpath/server.key -out $portal_serv_certpath/server.crt
Configure the KB to use AWS public Domain
What we need to do now, is to replace the default “jstack.com” site in all of the configuration files (Authelia’s one as well as Nginx sites) to whatever your public domain name is for this particular EC2 instance. This is very easy to do, just grab your public DNS name or issue curl -s http://169.254.169.254/latest/meta-data/public-hostname from within the bash console of your EC2 instance (AWS stores some handy metadata inside their containers, very smart and very useful for automation) and use one of two options:
Manually doing it
# Let's store the value of the public DNS name in a variable
publicdns=$(curl -s http://169.254.169.254/latest/meta-data/public-hostname)

# Let's use find and sed to replace "jstack.com" (must be run from "jstack-awesomekb" root dir)
find ./docker/compose/nginx -type f -print0 | xargs -0 sed -i "s/jstack.com/$publicdns/g"
find ./docker/compose/authelia -type f -print0 | xargs -0 sed -i "s/jstack.com/$publicdns/g"
sed -i "s/awesomekb.jstack.com/awesomekb.$publicdns/g" ./docker/docker-compose.yml
Using deploy.sh
This will achieve the same results
publicdns=$(curl -s http://169.254.169.254/latest/meta-data/public-hostname)
./deploy.sh replace-domain $publicdns
Generating the Documentation with Sphinx
We are almost there, what we need to do now is to make sure there is some documentation available in HTML format inside jstack-awesomekb/docker/compose/nginx/backend/html/awesomekb so that the backend nginx server can provide us with that site.
In order to achieve this, we will use a docker container for sphinx, in this case darkquasar/inca-sphinx:1.0.0. The jstack-awesomekb/docs folder comes pre-populated with a small portion (1%) of my own KB. We will use that as an example for the moment.
darkquasar/inca-sphinx:1.0.0 comes with “m2r” plugin which converts any Markdown documents to their reStructuredText equivalents before sphinx converts them, in turn, to html. It also comes by default with the readthedocs theme. You can find the Dockerfile used to build inca-sphinx as inca-sphinx-dockerfileThe idea behind using Sphinx is that it is a highly versatile solution, with a prolific developers’ community. Learning to write in .rst is not that different from Markdown and it’s far more powerful. Sphinx will allow you to document things like your code effortlessly by extracting docstrings within them. You can read about this and many other features in their official site
5. Running the KB Stack!
Finally here, change directory to jstack-awesomekb/docker then run docker-compose up --build. It will essentially build your stack so that’s available to be accessed from the outside.
Instead of
docker-compose up --buildyou can also run your stack in detached mode by appending-dto the end. The reason I’m not recommending to do this at this stage is because any errors that might show up will be immediately visible to you, as well as you will be able to see the http logs for all containers directly in stdout. This will help you understand what’s happening behind scenes. Your choice ofc!
Configuring DNS
Now there is still something else we need to do. Remember we are running the stack without any privately owned domains right? We are using the AWS auto-generated public ones. This means domain name resolution will not work as usual when you type in your AwesomeKB url. If you type something like this in your browser: awesomekb.ec2-8-8-8-8.ap-soutwest-3.compute.amazonaws.com (everything after awesomekb being the public hostname assigned by AWS) your browser won’t be able to resolve it. Thus, we need to use your own host as a simulated DNS server by editing your “hosts” file and adding entries for your KB.
First, go to your AWS instance and run this:
publicdns=$(curl -s http://169.254.169.254/latest/meta-data/public-hostname)
publicipv4=$(curl http://169.254.169.254/latest/meta-data/public-ipv4)

printf '\n[J-Stack-AwesomeKB] Add these to your hosts file:\n\n%b login.%b \n%b ldapadmin.%b \n%b mailcatcher.%b \n%b awesomekb.%b\n\n' $publicipv4 $publicdns $publicipv4 $publicdns $publicipv4 $publicdns $publicipv4 $publicdns
It’s output would be similar to this:
8.8.8.8 login.ec2-8.8.8.8.ap-soutwest-3.compute.amazonaws.com
8.8.8.8 ldapadmin.ec2-8-8-8-8.ap-soutwest-3.compute.amazonaws.com
8.8.8.8 mailcatcher.ec2-8-8-8-8.ap-soutwest-3.compute.amazonaws.com
8.8.8.8 awesomekb.ec2-8-8-8-8.ap-soutwest-3.compute.amazonaws.com
If you wonder, why wouldn’t I be able to just type in https://awesomekb.ec2-8.8.8.8.ap-soutwest-3.compute.amazonaws.com or https://8.8.8.8 and connect anyways?, well the answer is in here:
  server {
    listen 443 ssl default_server;
    server_name _;
    return 404;

    ssl on;
    ssl_certificate     /etc/ssl/server.crt;
    ssl_certificate_key /etc/ssl/server.key;
  }
We have configured our nginx frontend portal to decline any connections made to a server other than the ones listed explicitly in the config (like awesomekb.jstack.com). This server is called a default server and comes first in the list. The idea is to sinkhole any non-compliant attempts to access our webserver. This way, there is only one entrance: via Authelia and 2FA.
What if I have my own domain.com? well that’s great, keep reading as I provide some guidance on that too further below.
6. Accessing your AwesomeKB
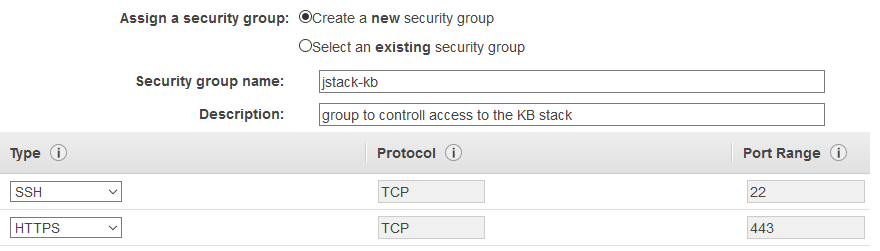
We have the stack up and running now, you can head to https://awesomekb.whatever-amazonaws.com and you shall be presented with Authelia’s login screen:
It looks great, however, you won’t be able to login yet, why? Because we need to at least create one user in our LDAP server so that he/she/them/it/you (personal pronouns in times of gender fluidity are a tricky thing to get right) can login.
Adding users and groups to LDAP Server
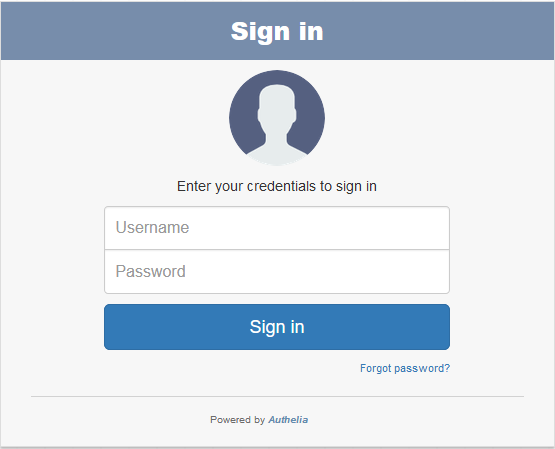
Let’s open another tab and head to “https://ldapadmin.whatever-amazonaws.com”, you will be redirected to the frontend PHP admin interface for the backend ldap. This is secured via simple http login (remember we created the .htpasswd file before?) so type in the creds for this user and logon!
Once there, you can either create your own LDAP structure (add users and groups, set permissions) or you can just import the default base.ldif file that comes with the repo. To do this, login to your LDAP instance using cn=admin,dc=jstack,dc=com as the user and password as the pass (assuming you left the defaults in place in the docker-compose.yml file). Once logged on, hit import in the upper left corner, copy the contents of base.ldif and paste them in the field. Click on “proceed” to import the structure.
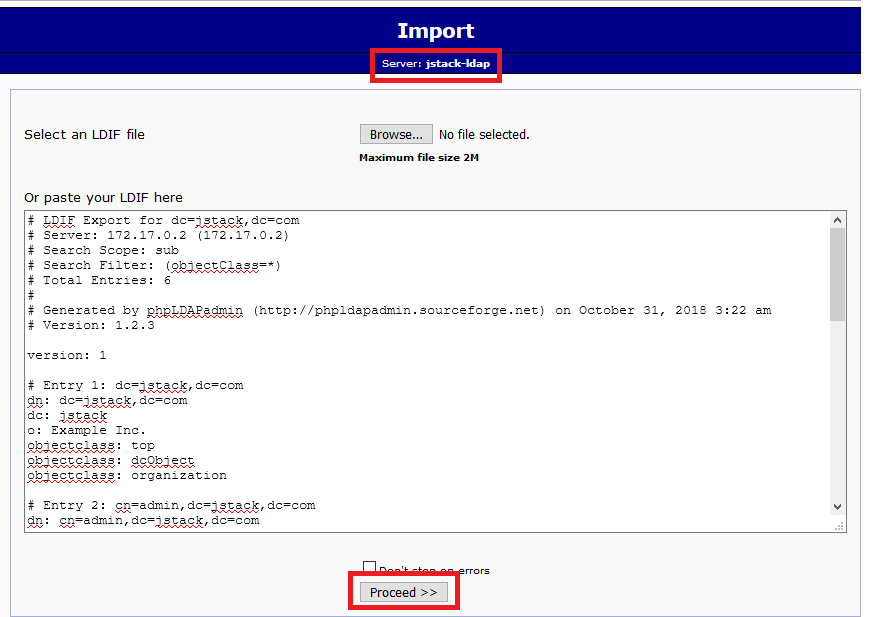
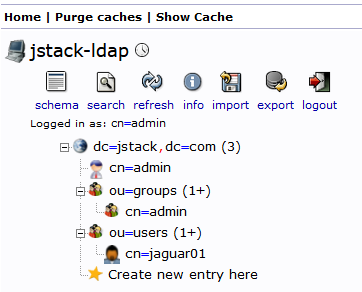
It may throw some errors, but don’t worry, the essential group and user will be created:
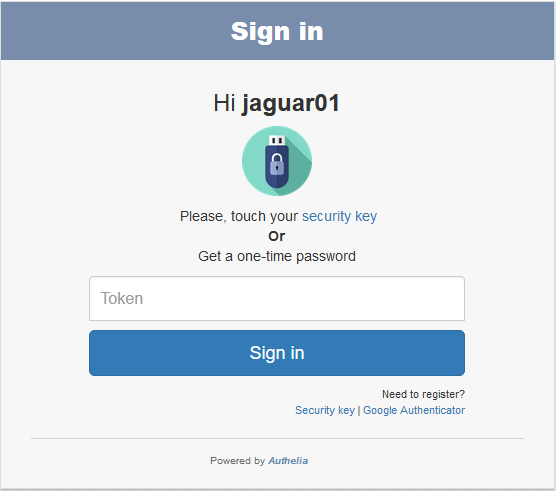
Finally Logging in!

So, once at this point, let’s head to the logon screen once more, type in the username (jaguar01) and password (password) and Authelia will take you to the 2nd factor logon screen:
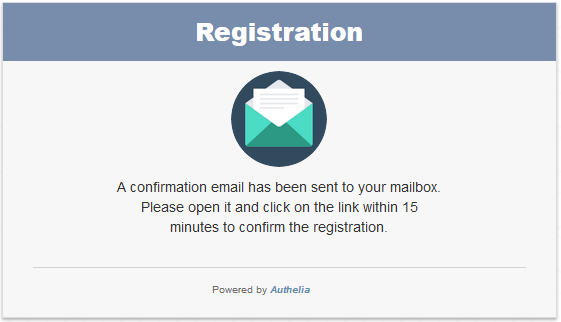
Authelia will confirm that it has sent an email to the email address belonging to the user (as per their LDAP record).
We configured Authelia so that MailCatcher can mimic a real world scenario where Authelia would send an email to the end user, that config is here:
notifier:
  # For testing purpose, notifications can be sent in a file
  ## filesystem:
  ##   filename: /tmp/authelia/notification.txt

  # Use your email account to send the notifications. You can use an app password.
  # List of valid services can be found here: https://nodemailer.com/smtp/well-known/
  ## email:
  ##   username: [email protected]
  ##   password: yourpassword
  ##   sender: [email protected]
  ##   service: gmail

  # Use a SMTP server for sending notifications
  smtp:
    username: test
    password: password
    secure: false
    host: 'smtp'
    port: 1025
    sender: [email protected]
You can also tell Authelia to use any other mailing service that nodemailer is capable of using. For example, I created a dummy gmail account to use as the sender.
So in the previous step, select google authenticator as the 2nd factor token. It will automatically send an email to MailCatcher. Let’s head there https://mailcatcher.whatever-amazonaws.com:
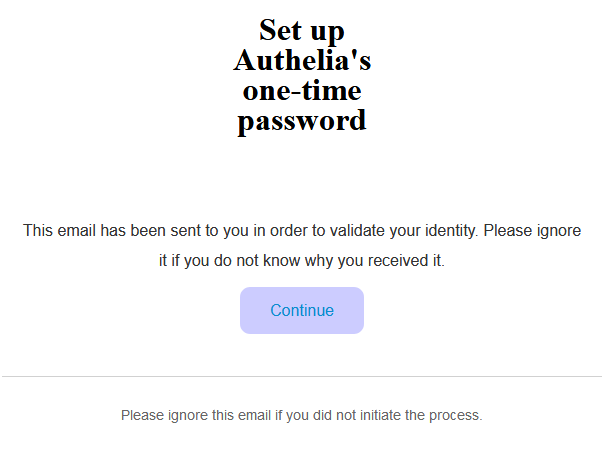
Once you click on “continue” you will be redirected to the page with the QR code for your phone to pick up the Google Authenticator account.
Done!
If you now head to https://awesomekb.whatever-amazonaws.com you will be able to use 2FA to login to your A-M-A-Z-I-N-G KB!
But, is it really FREE?
Well here’s the thing: you can run this KB stack on any virtual machine in the cloud with 1vCPU and 1GB RAM. You don’t need more than that. Amazon gives you 750hs for free out of instances in the free tier (BTW: I don’t work for Amazon, they just happened to be the cloud providers I went with, but I also use Azure and others).
Once you run out of the 750hs, the t2.micro instance will only cost you an astonishing $0.20 cents per day. If it costs me $0.20 cents/day to have my own KB up and running, I don’t believe that’s a bad deal ;)
Continuous Documentation Builds
What if you want to push changes to the documentation in your repos and have it automatically reflected on your AwesomeKB? You have 3 answers here:
- Use ReadTheDocs
- Create a Cron job
- Develop a script that can understand Github Webhooks
In my case, I used 2 for the moment, since I don’t have enough time (what a limited resource!) to develop the other options. So I will explain to you this one, because it’s the easiest way of getting up and running.
- Download
keychain(sudo apt-get install -y keychain) - Generate your SSH keys for the git service you connect to, in my case, Github:
ssh-keygen -t rsa -b 4096 -C "[email protected]"(accept defaults, it will store private and public key inside your~/.ssh) dir. - Run
eval `keychain --eval id_rsa`to load your profile for the first time. It will ask you the password to yourid_rsaprivate key. Once done, you won’t have to type in the password for the private key again in the same session. - Add
eval `keychain --eval id_rsa`to your.bashrcfile, so it gets executed upon logon at any time. - Connect to Github.com to add the host key to your trusted hosts file for the first time and test connectivity:
ssh -Tv [email protected]if all is good you shall see a message like Hi dude! You’ve successfully authenticated, but GitHub does not provide shell access. - Run
crontab -eand append at the end the command to launch thegit_pull_cronfunction insidedeploy.sh. In my case, I run it every minute and it looks like this:
* * * * * /home/dude/jstack-awesomekb/deploy.sh git-pull-cron dude/mykb awesomekb.jstack.com # where "dude/mykb" is the git repository
The first parameter is the name of your repo (note: your repo must contain a docs directory where your documentation structure is stored), the second is the name of the backend virtual server you want to output the produced documentation into (it will get dropped in current_repo_dir/docker/compose/nginx/backend/html/name_of_virtual_server). Remember that the name of your virtual server (in this example awesomekb.jstack.com) needs to match up with what’s written in all the nginx configuration files for the portal and backend nginx servers.
Done! now Cron will run the command every minute which will check your git repo and pull any commits (this way you only pull the diffs between commits).
Since the folder we are dumping the created documentation into is mapped to the backend nginx server, nginx will serve the new files.
Security Considerations
There are a few security concerns that we need to address. First, you may not completely trust a solution like Authelia for a variety of reasons like exploits could be available for the libraries it uses and there could be bugs in the platform itself. However, let’s point out some things:
- Any library out there can be exploited. Authelia uses code from multiple Node.js libraries and relies on them as a bazillion other apps do. Guys in the repo have been quite active in finding bugs and reporting them. The developer, Clément Michaud is highly responsive in this regard.
- We run all the stack in docker, which provides abstraction, which means even if one of the web servers gets compromised via some RCE vuln, intruders would only be able to browse the container itself, not the host machine.
- Our EC2 instance is configured to only allow traffic to the HTTPS and SSH ports.
- We are logging everything with docker-logger to a persistent location in the host machine. Tweak the parameters in docker-compose if you would like to keep bigger logs than the default ones.
- Once you finish your initial setup, you should disable single-factor access to ldapadmin.whatever.com as well as mailcatcher.whatever.com. You could configure them to be accessible via Authelia itself, or disable them altogether by erasing the
server {}blocks in nginx.conf of the portal. Ideally, you would already have your LDAP database created before running the LDAP server, this way, you won’t even need to access it for the first time. You could choose to run a different OpenLDAP docker image. The one I use has the ability to use bootstrap to create users/groups at run time.
Can we increase security?
Totally, here are two ideas:
Use Fail2Ban
You could deploy fail2ban to configure jails for your host and thus prevent bruteforce attacks by banning suspicious IPs. A clever guy in the Authelia repo already published a guide on how to do this with Authelia. Since we are logging logs from our containers into a host-based persistent volume, we should point the logs in jail.local to the authelia log files in our volume (also change backend = systemd to backend = polling, so it will poll those log files instead of relying on systemd, since we are using docker).
iptables with the blocked IPs. SSH bruteforce was effectively blocked, however, for some reason, HTTP access kept being accepted, regardless of iptables explicitly blocking the ip for all protocols. I did some tcpdump debugging and couldn’t find any issues. I don’t exactly know why this is the case (I sense it has something to do with AWS), if you get it working on your side, please ping me, post a comment or open an issue/PR in the github repo.Use Cloudflare SSL Proxy
Cloudflare will give you, for free (an account only needed), three massive benefits:
- Traffic proxying and caching as well as protection from DDoS
- Free signed certificates to pass on to your nginx portal (instead of using your self-signed ones, prompting browsers to trust self-singed certs all the time)
- Ability to only accept traffic coming from Cloudflare proxies. This way, you can configure the security groups in your AWS instance to only accept traffic from Cloudflare IPs. Anyone bypassing Cloudflare as a CDN/proxy to your site will simply not be able to connect.
Can we increase security even more?
Of course you can! Here are two ideas:
2+1FA With auth_basic
Make your KB 2+1FA (2 times password based + 1 time token based, it is not 3FA since we are not using a different category of authentication, but only twice “something you know” and once “something you have”). You can do this by adding auth_basic to your backend server’s awesomekb.conf so that you would have to enter another set of creds to actually be able to visualize your KB contents.
2+2FA With Cloudflare
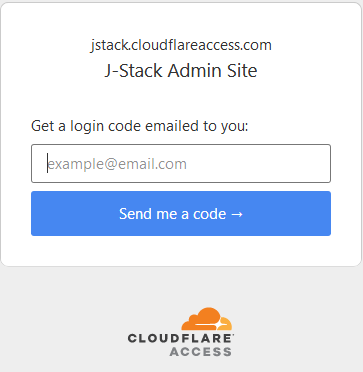
This option sort of defeats the purpose of using Authelia altogether, but you can choose to use either one of them, or both combined for extra-super-duper-hilarious access control (a bit of an overkill, but why not eh?). Downside to using Cloudflare is that you will be limited to authorizing 5 users under the free-tier whereas with Authelia you control the authentication server.
If you are using Cloudflare like me, you can use Cloudflare Access (or any other service that does something similar). Which essentially will allow you to authenticate up to 5 users for free using common identity providers (Github, Google, etc.). This way, if you have 2FA enabled for any of those providers, you will have 2FA via Cloudflare on top of 2FA via Authelia
Can we increase security even more?
There is always more you can do my friend!. For example, have a look at https://github.com/Jsitech/JShielder and have fun.
Can we make this AwesomeKB even more Awesome?
Now that you ask, there are a few things on the pipe, which, if I find time to add -and they fit within an EC2 t2.micro instance without degrading access performance- I will:
- Add GoAccess Log Analyzer. This will allow us to visualize stats about any visits to your KB from a nice web-based gui.
- Add a ReadTheDocs server, so that connecting to your private GitHub repo hosting your amazing documentation and updating your docs would be a breeze.
- If deploying ReadTheDocs is an overkill, then adding a commandline option to the darkquasar/inca-sphinx so that it listens for Github webhooks and re-builds the documentation that way.
- Add a self-service facility bestowing users with the ability to create an account and be granted access based on some pre-defined criteria (like their emails)
Have any other ideas? Please feel free to send me a PR or propose new things.
Credits
All I’ve done is cobbling up some things together in an attempt of doing some SecDevOps work. Credit goes in all honesty to:
- Authelia developer, Clément Michaud (dude I don’t have your twitter, otherwise I would link it) who not only created the app but also already had a docker-compose with the initial features configured.
- Carlos Perez (darkoperator) who inspired me to pursue the automation way for KBs.
- Docker and Sphinx community
- stackoverflow.com (oh yeah!)